What is Smart Astro Planner?
Smart Astro Planner is a planning companion for amateur astrophotographers. It is a long way from what a tool like Telescopius offers, and it does not try to replace it or compete with it. Telescopius and similar atlases are excellent, and you should keep using them.
Who it is for
Most amateur imagers do not live near the pole, where winter nights last for months, and they do not shoot under a Bortle 0 sky. Few can rent a spot in a remote observatory with better conditions. Most work from a backyard, with a horizon partly hidden by the house or the trees, and clear nights that come one at a time.
Very few can collect ten hours per filter, on three or four filters, in five or six consecutive nights. Real projects stretch over weeks, one clear night after another.
A different question
Most atlases include a Tonight's best list, and Telescopius goes much further with powerful filters, but the answer is always for a single date. Smart Astro Planner does not answer "What can I photograph tonight?" It answers a different question: "What are my options over the next few weeks?"
Give it your site and a period of one to twelve weeks. It builds a list of targets that are genuinely usable from your backyard, week by week, taking into account your horizon and the altitude you need. Equipment only comes into play afterwards, per target, when you preview the real framing.
The planning toolbox
- Target lists drawn from a local catalog of 19,000+ objects, filtered by how many hours per night each target is really usable from your site — above your minimum altitude and in the parts of the sky you can actually see — and by season.
- Weekly visibility and an altitude profile with the Moon's position, to see when each target is at its best.
- Framing Simulator: a real sky image with your sensor's field of view drawn on it, movable and rotatable, for any of your equipment configurations.
- Emission line measurement: how much Hα, OIII and SII lies inside your frame, to help choose between LRGB, HOO or SHO.
- My Targets: your actual shooting list — each entry pins a target to a specific framing, telescope/camera, and observing site, tracked as to do / in progress / done, with AI Capture Advice (a filter/palette strategy for that equipment and sky, no dates or weather involved).
- Night Info: transit and twilight times for your saved targets, useful for planning start/end and meridian flip times.
- Backup & sync between your devices.
Installing the App
Smart Astro Planner is a Progressive Web App (PWA). It runs in your browser but can be installed on your home screen for a native app experience with offline access.
On iPhone or iPad (Safari)
- Open Safari and navigate to the app URL
- Tap the Share button (square with upward arrow) at the bottom of the screen
- Scroll down and tap Add to Home Screen, then tap Add
On Android (Chrome)
- Open Chrome and navigate to the app URL
- Tap the three-dot menu → Add to Home Screen or Install App
On Mac or Windows (Chrome or Edge)
- Look for the install icon in the address bar and click it
- Or use Chrome menu → Cast, Save, and Share → Install Page as App
Once installed, your locations, equipment, targets and preferences are stored locally on your device, and the app itself is cached for offline use. An internet connection is only needed for Capture Advice (AI) and for online data: Wikipedia, Simbad and sky images.
Opening Help in a separate browser window
The Help tab has an Open in browser button that opens this guide in a new browser tab, allowing you to keep the app and the help side by side.
Two Operating Modes
Target selection is always local and instant — no AI or internet needed. The operating mode only affects the optional AI Description and Capture Advice cards:
| Assisted mode | Non-assisted mode |
|---|---|
| Requires a Claude API key (anthropic.com). The app calls Claude directly — everything happens inside the app. Cost: a few cents per request, at most. |
No API key needed. The app generates a ready-to-use prompt. You paste it into any AI (Claude, ChatGPT, Gemini, etc.), then paste the response back. Cost: free — uses your existing AI plan. |
First-Time Setup
1. Configure your API key (assisted mode only)
Go to Settings, enter your Claude API key from console.anthropic.com, and set the mode to Assisted. Leave it as Non-assisted if you prefer to use another AI manually.
A Model dropdown appears once Assisted mode is on. Tap Load models to fetch the list of models available to your key, then pick which one to use for AI Description, Capture Advice and Fetch specs. It's your key and your cost, so the choice is yours — a newer/larger model tends to know more (useful for recognizing recent gear when fetching specs) but costs more per request.
Don't have a Claude API key yet?
The API key is separate from a regular claude.ai subscription — it's billed pay-as-you-go (a few cents per request in this app) rather than a monthly plan. To get one:
- Create an account at console.anthropic.com (this is the developer console, different from claude.ai).
- Add a payment method under Billing — required before any key will work, even for small amounts.
- Go to API Keys, create a new key, and copy it right away — it's only shown once.
- Paste it into Smart Astro Planner's Settings, as described above.
2. Add your equipment
Go to the Equipment tab and tap +. Fill in your telescope, camera sensor specs, mount, controller, and available filters. In assisted mode, tap Fetch specs (for the sensor or the telescope) to auto-fill specs by model name — best effort; fill in manually anything it can't find.
3. Add your location
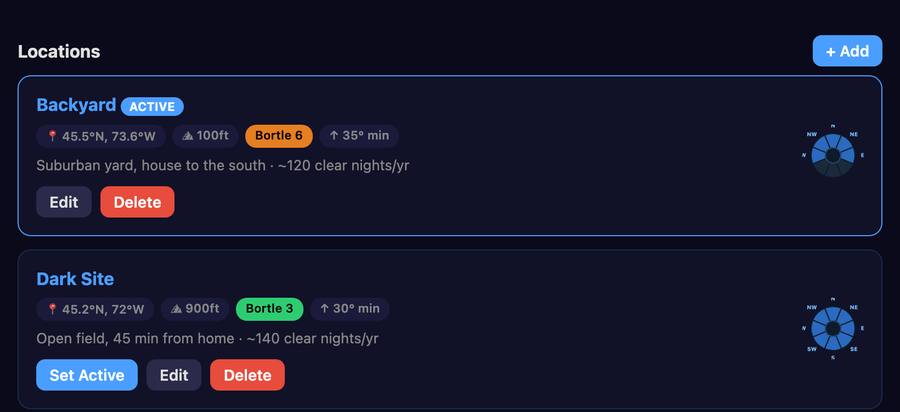
Go to the Locations tab and tap + Add to add your first observing site with coordinates, elevation, Bortle class, estimated clear nights per year, and minimum imaging altitude. Use Use my location to auto-fill GPS coordinates. No location is pre-configured — you need at least one before generating a target list.
Each location can also have a Horizon Mask — see the next section.
Horizon Mask
Each observing location can have a horizon mask — a map of which compass directions are actually visible from that site. This accounts for obstructions like buildings, trees, or terrain that block part of the sky.
Configuring the mask
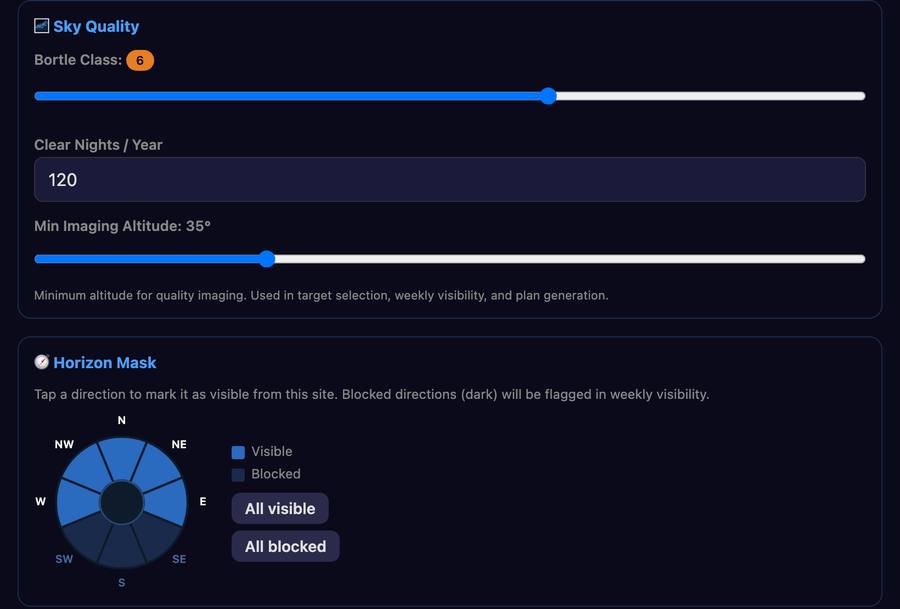
In the Locations tab, tap Edit on a location and scroll to the Horizon Mask section. A compass rose with 8 sectors (N, NE, E, SE, S, SW, W, NW) is shown. Tap each sector to toggle it between visible (blue) and blocked (dark). Use All visible / All blocked for quick setup.
Each location also has a Min Imaging Altitude (default 35°). It applies to all target selections and visibility calculations for that site.
How the mask is used
- Target selection — targets that are never in a visible sector during the astronomical night (even when above the minimum altitude) are excluded from the list.
- Visibility ratings — the weekly ratings count only the hours the target is above the minimum altitude and in a visible sector (see Understanding Visibility Ratings).
The horizon mask is shown as a small compass rose on each location card in the Locations tab — blue sectors are visible, dark sectors are blocked.
Understanding Visibility Ratings
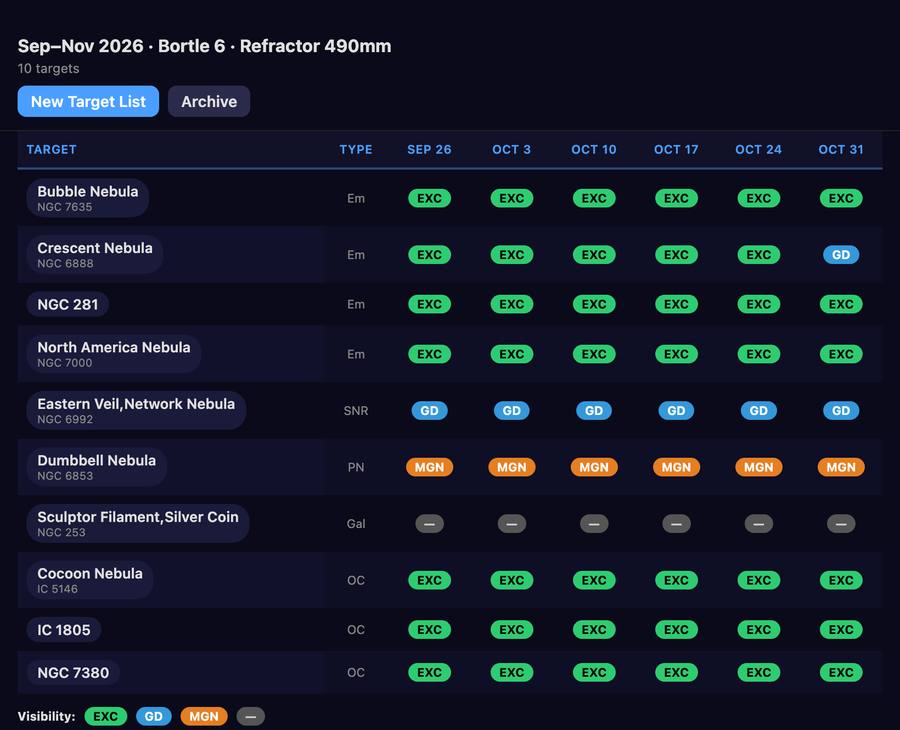
For every target, the app rates each week of your search period. The rating is based on the usable hours per night: the hours of astronomical night (Sun more than 18° below the horizon) during which the target is above your location's minimum altitude and, if you set a horizon mask, in a direction you can actually see.
| Rating | Meaning | Usable hours per night |
|---|---|---|
| EXC | Excellent — long imaging window | ≥ 4 h |
| GD | Good — decent imaging window | ≥ 2 h |
| MGN | Marginal — short window | > 0 h |
| — | Not usable from this site | 0 h |
The rating uses one night in the middle of each week, computed with the astronomy-engine library from your location's coordinates. It does not take the Moon into account — see Moon sensitivity in the Target Detail section for that.
Generating Your Target List
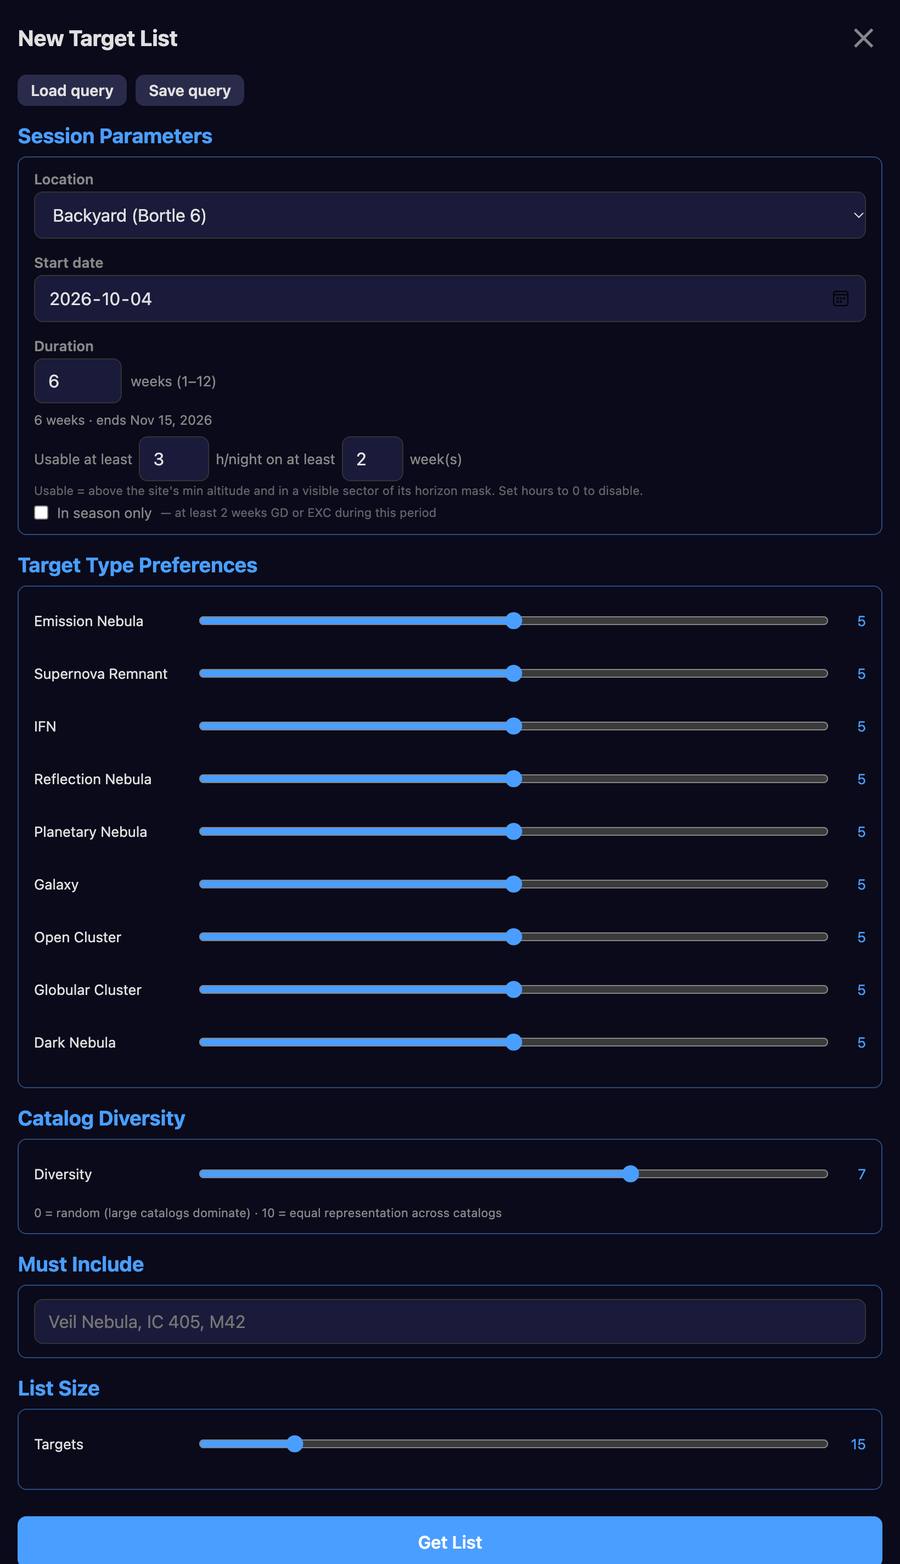
In the Targets tab, tap New Target List. Target selection is instant — it draws from a local catalog of 19,000+ objects with no internet required, and has no equipment or field-of-view concept: it is purely about where and when a target is visible from your site. Equipment only comes in afterwards, per target, in the Framing card, where you can preview any of your configurations against the real sky.
Session parameters
- Location — select from your saved observing sites. The location's minimum altitude and horizon mask are used automatically.
- Start date — the beginning of your imaging period
- Duration — 1 to 12 weeks. Use 1–2 weeks for a "next target" search, 6–12 for long-range planning.
- Usable hours — keep only targets usable at least H hours per night (above the site's min altitude and inside the visible sectors of its horizon mask, see Understanding Visibility Ratings) on at least N weeks of the period. Set hours to 0 to disable.
- In season only — when checked, keeps only targets rated Good or Excellent for at least 2 weeks of the period (see Understanding Visibility Ratings). It removes targets that are only barely visible at the start or end of your search.
Target type sliders (0–10)
- 0 = exclude entirely · 10 = highest priority · 5 = balanced
- 9 types: Emission Nebula, Supernova Remnant, IFN, Reflection Nebula, Planetary Nebula, Galaxy, Open Cluster, Globular Cluster, Dark Nebula
Setting a slider to 0 completely excludes that type. Higher values increase the probability of that type being selected.
Catalog Diversity
Within a given type, some source catalogs are much larger than others (for example OpenNGC galaxies vastly outnumber the smaller specialized catalogs). The Diversity slider counterbalances this: at 0, sampling is purely random and large catalogs dominate; at 10, all source catalogs of that type get roughly equal representation. A middle value gives a reasonable mix without drowning out the smaller catalogs.
Must Include
Enter specific object names or catalog IDs separated by commas. The search is case-insensitive and matches partial names — typing "Veil" will include all Veil Nebula components. Example: Veil, IC 405, Andromeda
List Size
Use the slider to select between 10 and 50 targets.
Saved queries
Tap Save query to save all current parameters under a custom name (e.g. "Galaxy Season", "Winter Narrowband"). Tap Load query to reload a saved query and pre-fill all fields.
Reading the Target List
Your targets appear sorted by type (in slider order) then alphabetically. Each target shows a type abbreviation (Em, SNR, IFN, Ref, PN, Gal, OC, GC, Dk) and a row of weekly visibility ratings (see Understanding Visibility Ratings).
Tap any target row to open its detail screen.
Target Detail Screen
The detail screen shows comprehensive information about a target, in this order:
- Weekly Visibility — the rating of each week of your period
- Framing — a real sky image with your field of view on top, and an emission-line measurement
- Altitude Profile — interactive chart of the night, with twilight zones and the Moon
- Best Season — monthly chart of the best imaging months
- Filters — recommended filters with a moon sensitivity indicator
- Wikipedia, Simbad and AI Description — background information about the object
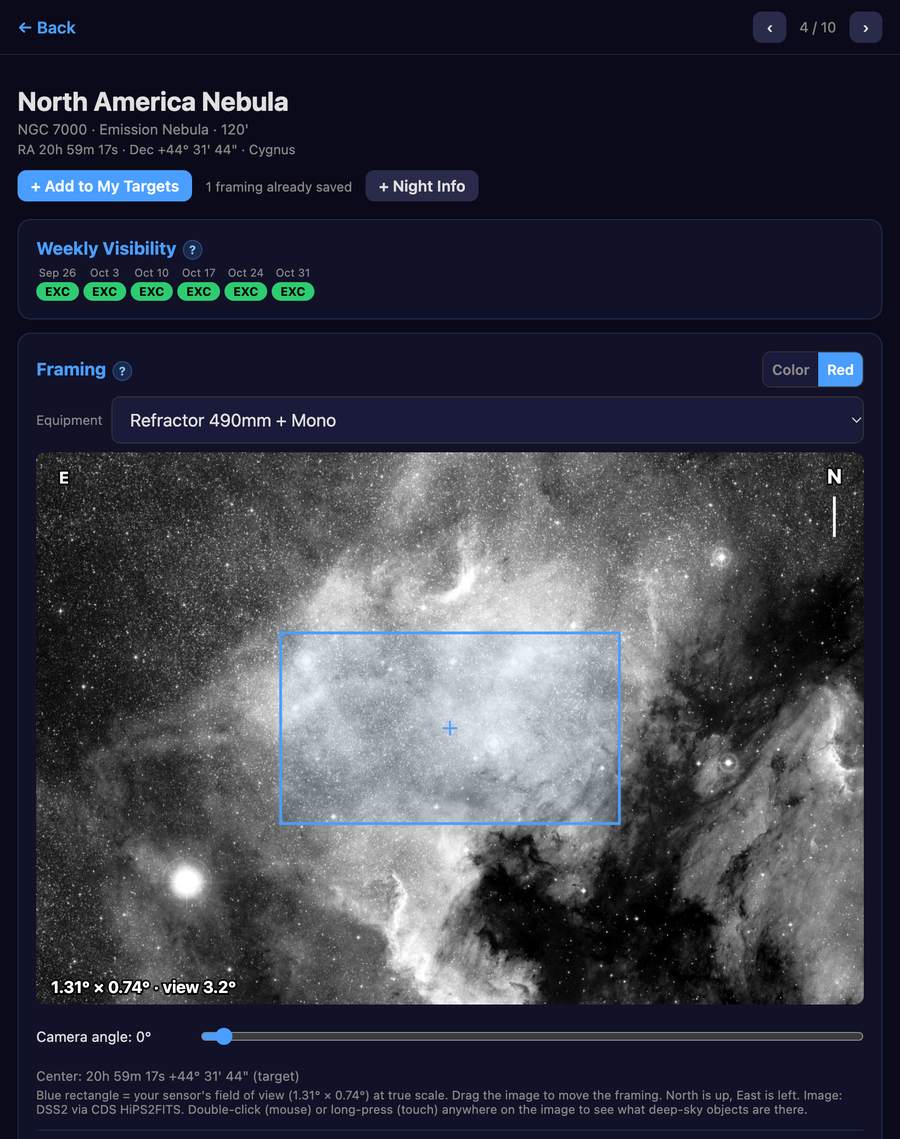
Moon sensitivity
Based on the target's default filters:
- Insensitive — narrowband only, shoot any moon phase
- Partial — mixed filters, prefer darker skies for broadband channels
- Sensitive — broadband, prioritize new moon
Navigating between targets
Use ‹ and › at the top of the screen to move between the targets of your list without going back — a position indicator shows where you are (e.g. 3 / 14). On a touch screen, you can also swipe left/right anywhere on the screen to do the same, except while dragging the Framing image, rotating its camera-angle slider, or moving the Altitude Profile slider.
Framing (Framing Simulator)
When enabled in Settings and an equipment configuration exists, the detail screen shows a real sky image (DSS2, from the CDS HiPS2FITS service) centered on the target with your sensor's field of view drawn on top at true scale. North is up, East is left. Because it is a real image rather than a catalog size, it stays accurate even when the catalog's own size data is missing or wrong.
- Color / Red — Red shows faint emission nebulae much better (the red plate is sensitive to H-alpha) and does not saturate bright cores; Color looks more natural for galaxies and clusters. Red is chosen by default for emission nebulae, supernova remnants and planetary nebulae, Color for the rest. When you switch, your choice is remembered for that object type (and included in the backup).
- Automatic or on demand — in Settings → Preferences → Sky image in Framing you can choose Automatic (the image downloads as soon as you open a target, as described above) or On demand. On demand first shows only an outline: your sensor's field of view (blue) and the target as a dashed outline at true scale, taken from its catalog size, with a line such as "Target 6.7′ · about 9% of the frame width" (and "tiny in this frame" when you could not see it anyway). Tap Load sky image to download the picture for that target; until then nothing is downloaded, which saves time and mobile data and spares the CDS service. You can still drag to reframe, rotate the camera and double-click or long-press for What's in my Frame? on the outline. Catalog sizes can be approximate (and a few objects have none — the outline then says "size unknown"), so use it as a hint, not a verdict. An image already stored on your device appears right away.
- Camera angle — slider that rotates the field-of-view rectangle to test different camera orientations.
- Equipment — if you have several configurations, a selector changes the size of the rectangle to preview the same target with another telescope/camera. It does not change your target list.
- Moving the framing — drag the image to shift the framing. The rectangle stays at the center; when you release, a new image centered on the new position is loaded. The coordinates of the center are shown below the image, with a Reset to target button to come back.
- What's in my Frame? — double-click (mouse) or long-press (touch) anywhere on the image to search the local catalog for other deep-sky objects at that spot. Matches are drawn as amber ellipses on the image and listed below, largest first; tap one to highlight it, or + Add it to your current target list (using the same site and period as your search). Available when viewing a search result, not from a My Targets entry.
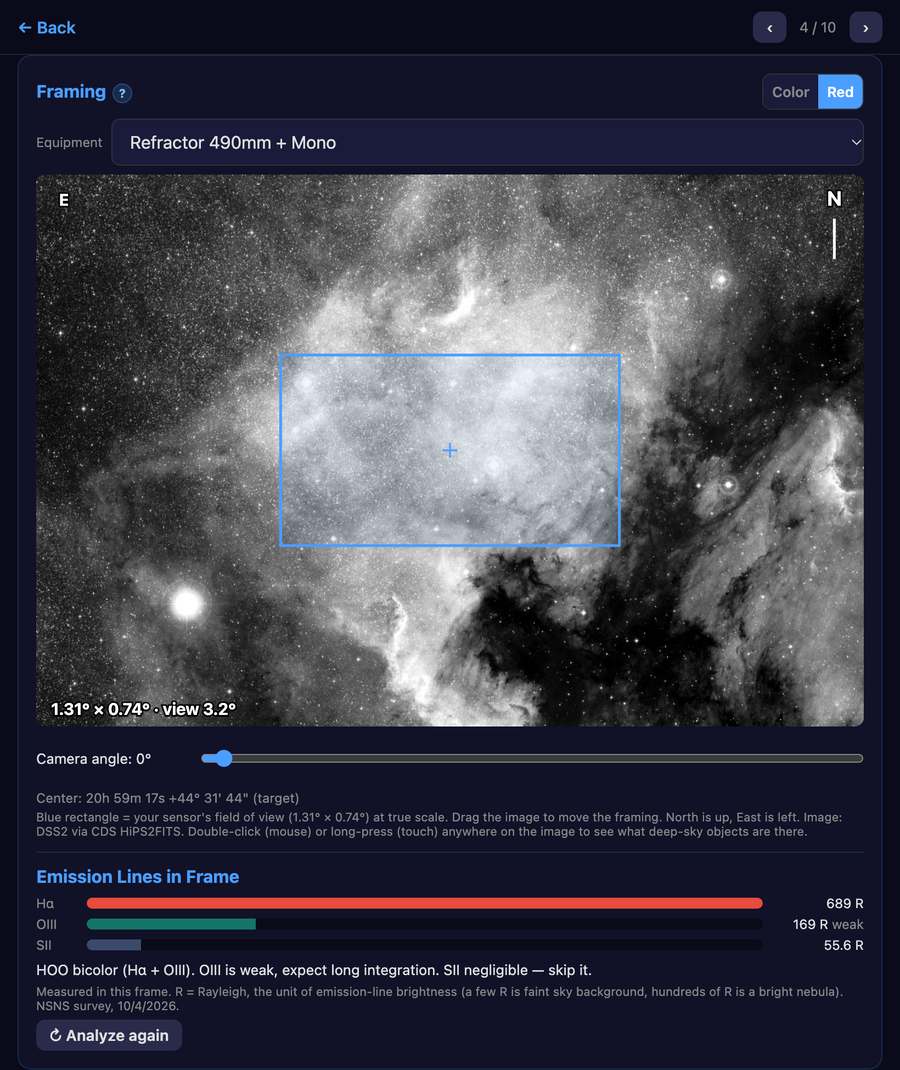
Emission Lines in Frame
Under the framing image, Analyze framing measures how much Hα, OIII and SII signal lies inside your current frame (position, angle and equipment), using the Northern Sky Narrowband Survey. It shows one bar per line, the intensity in Rayleighs, and a suggestion: LRGB when the emission is very faint, otherwise HOO, SHO, an Hα bicolor or a single narrowband filter, with the weak or negligible lines called out.
- The measurement runs only when you tap the button (about 0.7 MB of data), never automatically.
- If you move the frame, rotate it or change equipment, the result is dimmed with a warning until you analyze again, so it always matches what you would actually shoot.
- The last analysis of each target is saved on the device. In assisted mode it is included in the AI Description and Capture Advice prompts, so the AI can skip lines with negligible signal.
- Coverage is the northern sky (about 65 % of the sky). Outside it, the app tells you no measurement is available.
The rectangle starts centered on the catalog coordinates of the target (or, in My Targets, the exact framing you saved). Images are cached on the device (up to 80) and the oldest are removed automatically. Settings → Preferences shows the number of cached images and their total size, with a Clear button.
Altitude Profile
An interactive chart showing the target's altitude throughout the night. The background is shaded to indicate twilight zones:
- Lightest band (edges) — civil twilight (sun -6° to 0°)
- Medium band — nautical twilight (sun -12° to -6°)
- Darkest band (center) — astronomical night (sun below -18°)
The blue filled area shows when the target is above the location's minimum imaging altitude. A dashed line shows the Moon's angular separation from the target on the same 0–90° scale — the dash pattern reflects lunar phase (dotted = new moon, solid = full moon).
Use the slider below the chart to navigate between weeks. Swipe on the chart, or tap ‹ ›, to toggle between WEEK mode (weekly overview) and DAY mode (day-by-day within the selected week) — the slider then moves through weeks or days depending on the current mode.
Which filters can I shoot? (the filter badges)
The dashed grey line is the Moon's angular distance from the target — it only shows where the Moon is. To know what that means for your filters, set Moon Separation Thresholds in Settings → Preferences: the minimum distance, in degrees, at which you are comfortable shooting Hα, OIII, SII and/or Broadband (one shared value for L, R, G and B). Under the chart (above the slider, so your finger never hides them while you drag it) you then get one badge per filter of this target's own equipment:
- Full color — the Moon stays at least that far away for the whole astronomical night. You can shoot it.
- Dashed and faded, with ◐ — usable for part of the night only. The hours are listed just below (for example "OIII: 18:21–00:11").
- Grey — the Moon is too close all night for that filter.
The line under the badges also tells you how far the Moon is during that night (for example "120–122°"). The badges follow the slider: move it through the weeks, or switch to the day-by-day view, and they recalculate for the night you are looking at. A filter whose threshold you left blank is not shown (and is listed as such), and if you leave all four fields blank the badges are hidden. On a computer, hover a badge to see the threshold you set for it.
Best Season
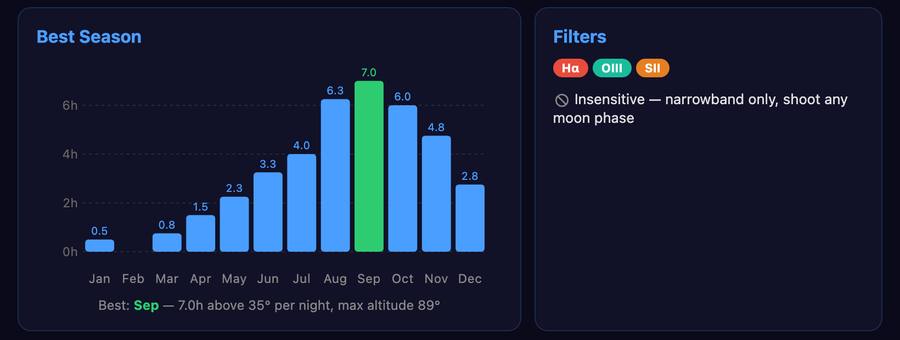
A bar chart showing how many hours per night the target is above the location's minimum altitude during astronomical night, for each month of the year. The best month is highlighted in green.
This helps answer the question: when is the best time of year to image this target from my location? Like the Altitude Profile, it follows your current framing center once you have moved it.
Wikipedia, Simbad and AI Description
At the bottom of the detail screen, cards give background on the object:
- Wikipedia — photo and description, when an article exists (fetched live), with a link to read the full article on Wikipedia
- Simbad — common name(s) when Simbad knows one, object type, magnitude, distance, radial velocity when known, plus catalog cross-identifications (fetched live)
- AI Description — assisted mode only, see below
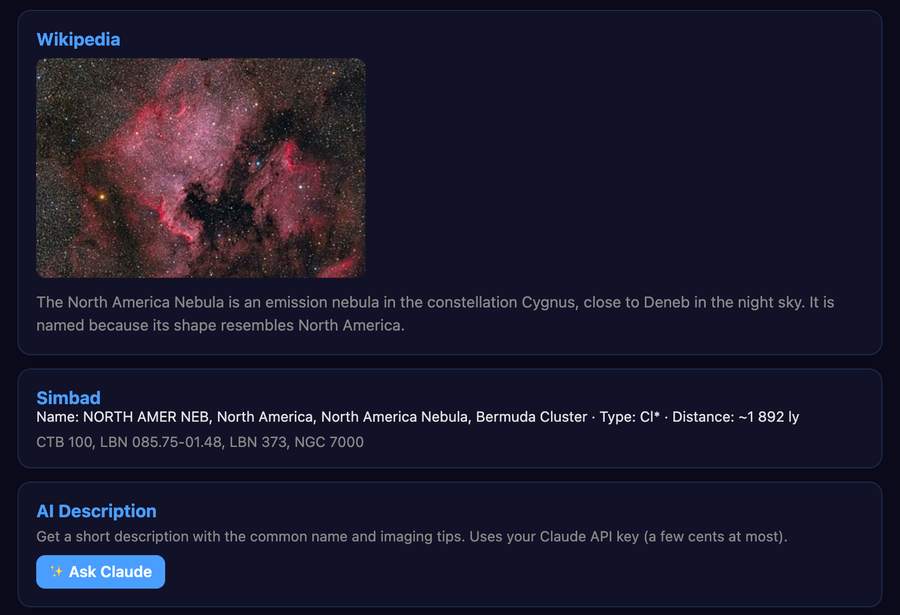
AI Description
In assisted mode (with a Claude API key), the bottom of the detail screen has an AI Description card. Tap ✨ Ask Claude to get a short description: the common name if there is one, what the object is, and practical imaging advice (filters, size compared with your field of view). Useful for catalog entries that have no Wikipedia article.
- The request includes the catalog data and the Simbad identifications, so Claude can recognize objects that appear under several catalogs.
- Claude is asked to say so when it is unsure rather than guess, but AI can be wrong — verify a common name before relying on it.
- The answer is saved on the device and shown instantly next time; tap ↻ Regenerate to ask again. Each request costs a few cents at most, counted in Settings → API Usage.
Saved Queries
A saved query stores all search parameters — location, period, all sliders, diversity, Must Include, list size — under a custom name.
- Save query — tap in the New Target List screen after configuring parameters
- Load query — tap to open the list of saved queries and pre-fill all fields
Saved Target Lists
Tap Archive next to "New Target List" to save your current list. A dialog asks for a name (required) and optional description.
Saved lists appear at the bottom of the Targets tab. Tap any to reload it as the active list. Each has a Delete button.
My Targets
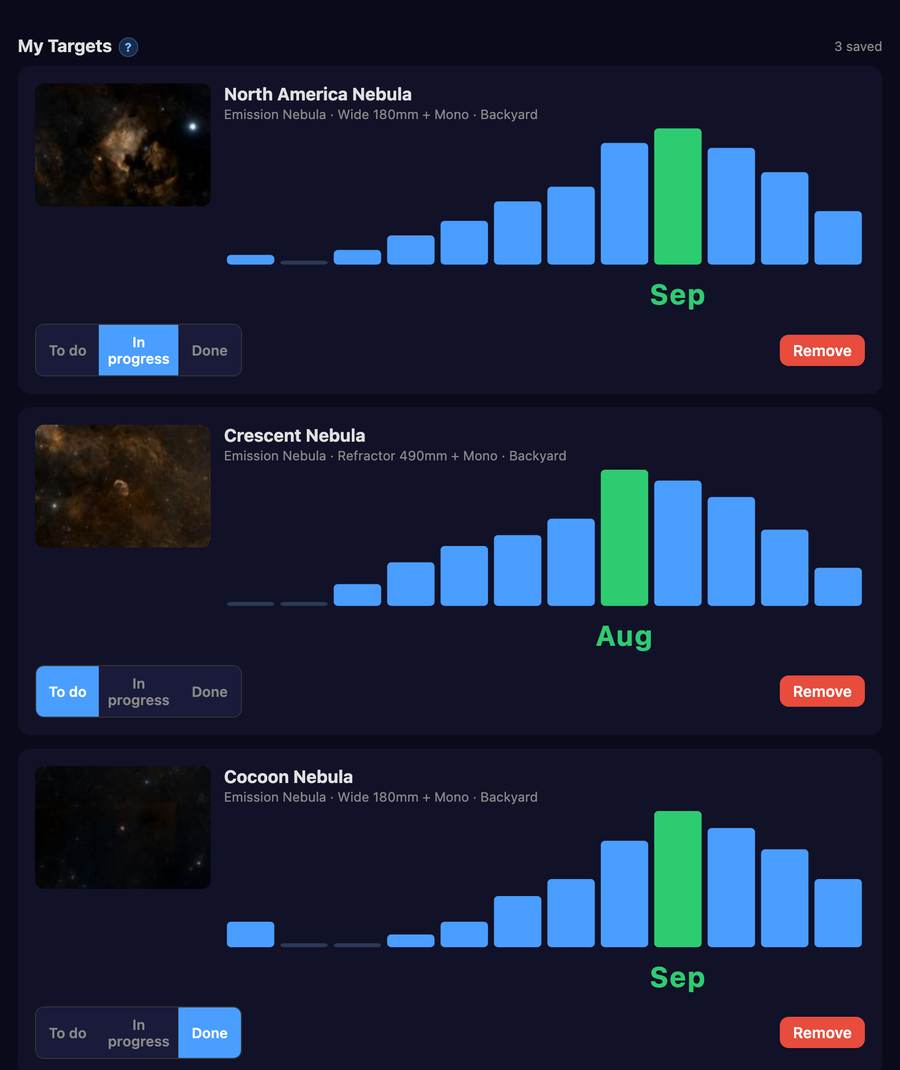
This is the heart of Smart Astro Planner — the list of targets you actually intend to capture, each one pinned to a specific framing, a specific telescope/camera, and a specific observing site. When you're ready to start a new target, this is where you come to pick one: everything you need (RA/Dec, camera angle, equipment, site) is already fixed and waiting, nothing to re-decide.
Saving a framing
From a search-result target's detail screen, adjust the Framing card the way you want it — position, camera angle, equipment — then tap + Add to My Targets. The site is whatever location that search was run for. It always creates a new entry, so framing the same object again with a different lens, a different angle, or from a different site is a deliberate, separate entry rather than an overwrite — useful if you image the same target from two different setups (e.g. a backyard rig and a remote observatory).
The My Targets tab
Each card shows a vignette of the saved framing, the equipment and site used, a small unlabeled Best Season chart (for that entry's own fixed site), and a status control: To do, In progress, Done. Tap a card to open it.
Viewing a saved entry
Opening a My Targets entry reuses the same detail screen as a search result, with a few differences:
- The equipment and the site are both fixed (shown as text, not selectors) — they're part of what you saved, and can't be changed afterward. If you need a different site or setup for the same object, save it again as a new entry instead.
- Weekly Visibility and the Altitude Profile look 12 weeks ahead from today rather than a past search period, always for that entry's own fixed site.
- Dragging or rotating the Framing image saves automatically back into the entry — there is no separate save step.
- A Capture Advice card replaces the Wikipedia/Simbad section's usual companions.
Capture Advice
In assisted mode, tap ✨ Get Capture Advice for a recommendation based only on the target, your fixed equipment, your site's Bortle class, and any emission-line measurement you have taken — deliberately no dates, no weather, no total integration time, since none of that is known this far ahead. It suggests a filter/palette strategy, a relative integration split across filters (percentages, not hours), and calls out anything that will be difficult from your sky darkness or hard to frame. In non-assisted mode, copy the generated prompt into any AI and paste the response back.
Night Info
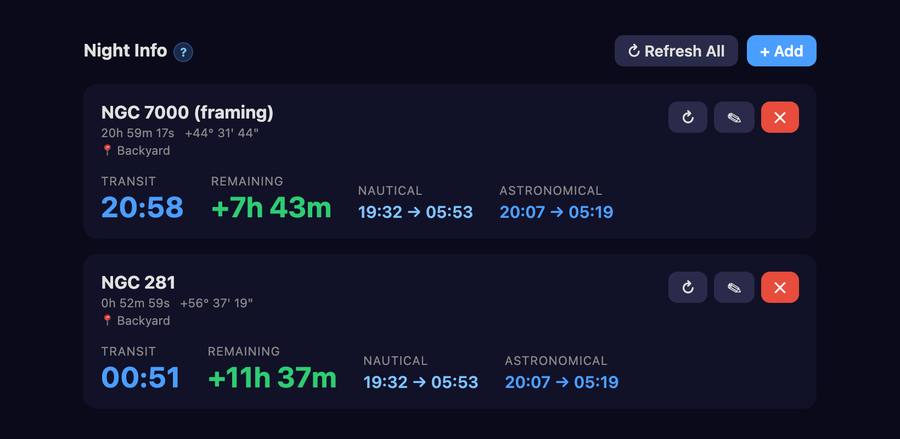
The Night Info tab lets you save targets with their exact framing coordinates and instantly see when they will transit and the twilight windows for the night — without switching between apps or recalculating by hand each night.
The primary use case is verifying your mount's meridian flip time. If your mount (e.g. Stellavita) displays a time remaining before flip, add the current time to get the expected transit time, then compare it to what Smart Astro Planner shows.
Adding a target
Tap + Add in the Night Info tab, or tap + Night Info on any target detail screen to pre-fill the coordinates automatically.
- Name — a label for the target (free text)
- RA — enter as 6 digits HHMMSS (e.g. 005411 for 0h 54m 11s)
- Dec — tap the + / − button to set the sign, then enter 6 digits DDMMSS (e.g. 563719 for +56° 37' 19")
- Location — select from your saved observing sites
A formatted preview (0h 54m 11s / +56° 37' 19") appears below each field as you type to confirm your entry.
Reading the card
- Transit — local time when the target crosses the meridian (highest point in the sky)
- Remaining — signed time until transit: +1h 23m (green, future), −0h 08m (orange, just passed), −2h 15m (grey, well past)
- Nautical — nautical dusk → nautical dawn (sun at −12°): the window used for polar alignment
- Astronomical — astronomical dusk → astronomical dawn (sun at −18°): the true imaging window
All times are calculated for the target's assigned location. Tap ↻ on a card or ↻ Refresh All to recalculate with the current device time.
Verifying your mount's flip time
- Note the time remaining displayed by your mount
- Tap ↻ Refresh All in Smart Astro Planner
- Compare the Remaining value with your mount's value — they should be close
A significant discrepancy (more than a few minutes) indicates your mount's internal calculation may be drifting or using incorrect coordinates.
Backup & Sync
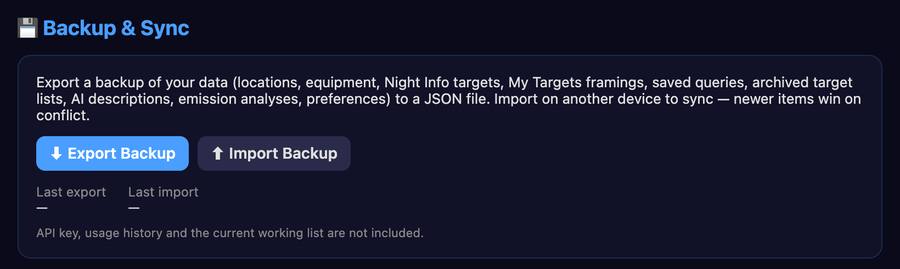
Go to Settings → Backup & Sync to export and import all your data as a single JSON file.
What is included
- All locations (with horizon masks and min altitude) and equipment configurations
- Night Info targets and My Targets (saved framings, statuses and Capture Advice)
- Saved queries and archived target lists
- AI descriptions and emission-line analyses, so they do not need to be requested or measured again
- Preferences (list size, Wikipedia/Framing Simulator toggles, Color/Red choices, Moon Separation Thresholds), the assisted/non-assisted mode, the LLM provider and your chosen Claude model
Not included: your Claude API key (for security), the API usage history, and the search-result list currently on screen. Assisted mode is only applied on a device that already has an API key.
Exporting
Tap ⬇ Export Backup. The file is named sap-backup-YYYY-MM-DD.json. On supported browsers, a save dialog lets you choose the destination directly (e.g. iCloud Drive). On Safari iOS, the file opens in a new tab — tap Share → Save to Files to save it to iCloud Drive or another location.
Importing
Tap ⬆ Import Backup and select a backup file. The import uses a merge strategy: each item is compared by its last-modified timestamp, and the more recently modified version wins. Nothing is deleted — items present on the device but absent from the backup are kept. Saved queries and archived lists are added when new; AI descriptions and analyses keep the most recent version for each target; preference changes are merged.
The site and equipment that were active on the exporting device are applied only on a device that has not chosen one yet.
A confirmation toast reports what changed: Locations: +2 new, 1 updated · Equipment: already up to date.
Syncing between devices
- Export on device A → save to iCloud Drive (or AirDrop to device B)
- Import on device B → only newer changes are applied
The Last export and Last import timestamps in Settings help you track when each device was last synced.
Local Database
The app includes a local catalog of 19,092 deep sky objects from 12 professional astronomical catalogs. No internet connection is needed for target selection.
Go to Settings → Local Database to see a breakdown by object type with source catalogs.
Source catalogs include OpenNGC (NGC/IC), Sharpless, van den Bergh, Cederblad, RCW, Barnard, LDN, LBN, Green SNR, Strasbourg-ESO Planetary Nebulae, Dias Open Clusters, and Mandel-Wilson IFN.
Tips & Best Practices
- Use Must Include for targets you already know you want — partial name matching means "Veil" adds all Veil Nebula components.
- Targets showing EXC only in early weeks are setting quickly — prioritize them first.
- Check the Altitude Profile chart — a target can be EXC but only above your minimum altitude for a short window.
- Use Best Season to decide if a target is worth imaging now or better saved for another time of year.
- Save a framing to My Targets as soon as you like it — it is much faster to pick up again than re-running a search and re-finding the same object.
- Set Moon Separation Thresholds in Settings once, per filter — after that, a glance at the filter badges under the Altitude Profile tells you which filters the Moon leaves usable that night, no math required.
- Create saved queries for recurring searches — "Summer Narrowband", "Winter Galaxies", "Next Target (1 week)".
- Give archived lists descriptive names like "Cygnus Deep SHO — Sep 2026" rather than dates alone.
- Generating target lists is instant and free — tap New Target List as many times as you want to re-roll.
- Use Open in browser in the Help tab to keep this guide open alongside the app.
- Stuck on a specific card? Look for the small ? button next to its title (Weekly Visibility, Framing, Altitude Profile, Best Season, My Targets, Night Info, Backup & Sync) — it opens the exact matching part of this guide, right where you are, no need to switch tabs.
- For anything broader — "how do I…", "why is…" — tap the floating ❓ button (bottom-right, any tab) to ask a free-form question. It answers from this guide (in assisted mode, a few cents per question).
How to Get Support
The developer offers support for this app on the Astro Dev Hub Discord server — join with this invite link: https://discord.gg/bwkWKcajRM
Change Log
What changed in each version, newest first. The version you are running is shown in Settings → About; if it is older than the top entry below, close and reopen the app (installed apps sometimes need a second launch, or a refresh, to pick up an update).
2026-10-07
- New: "Sky image in Framing" setting (Settings → Preferences) — Automatic (as before) or On demand. On demand first shows an outline of your camera's field of view and of the target at true scale, with a Load sky image button, so you can skip the download for targets too small to matter and save time and mobile data.
- The sky-image service (CDS) is now used more gently: one request at a time, and the My Targets thumbnails load one after the other.
- Settings → About now lists the full acknowledgements for the sky surveys, the CDS services and the catalogs.
2026-10-06
- Altitude Profile: filter badges. Under the chart, one badge per filter of your equipment shows what the Moon leaves usable that night — full color = all night, dashed ◐ = part of the night (the hours are listed), grey = too close. They follow the week/day slider and sit above it so your finger does not hide them. This replaces the colored Moon line.
- Fixed Moon distance thresholds above 90° (typically Broadband) never being reached.
- If the main CDS sky-image server stops answering, the app now switches to its mirror automatically and shows a clear message instead of spinning forever.
2026-10-04
- Location form: the Timezone list now contains every timezone (about 420, it had 12).
- The astronomy calculations are now stored with the app, so visibility, altitude and transit work fully offline — for example at a dark site without internet.
- The Wikipedia card links to the full article. A credit line with links sits under the Framing image.
- New app and navigation icons. New How to Get Support section (Discord).
2026-10-01
- My Targets now fixes the observing site (like the equipment): each saved framing keeps the site it was planned for, shown on its card, and Best Season and the Altitude Profile use that site.
- What's in my Frame? — double-click (mouse) or long-press (touch) on the sky image to list the deep-sky objects at that spot, outlined on the image, and add them to your target list.
- + Night Info is now also available from My Targets, and sends the framing center you dragged to.
Earlier (September 2026)
- Choose which Claude model powers the AI features; "Fetch specs" for telescopes as well as sensors.
- Moon Separation Thresholds in Settings; small ? buttons that open the matching part of this guide; the floating ❓ Ask AI box.
- My Targets replaced dated session plans; Framing with real sky images and Emission Lines in Frame; Backup & Sync between devices.
Smart Astro Planner — a project by Crepusculum (crepusculum.space)
AI powered by Claude (Anthropic) · Object catalog from VizieR/CDS, OpenNGC, Wikipedia, and Simbad